How to add Games to Pandora Box
There are many versions of Pandora's Box, from those corresponding to the original manufacturer 3A Games that remained in the Pandora's Box 6, to the evolved superior versions such as Pandora Box 7 3D, also known as 3D Moonlight Treasure Box 7 or Pandora 7 Key, or in the very latest models simply Pandora 7 Saga 3D.
All these Pandora differ mainly in the motherboard, which determines the possibility of adding games or not in a simple way, and the way to do it.
Amlogic S812 boards and similar
The newer models of Pandora 7 3D SAGA or Pandora 7 3D SAGA EX are based on the Amlogic S812 board. These new models are distinguished by the user interface, which now have more options in the Menu such as categories (by types of games or emulators) and a necessary game search engine. They also come with more languages, including Spanish, and finally a way to save games in 2D games (save state).
You can buy the product here:

The way to add games is somewhat complex but very powerful and much more functional than in previous models.
This S812 motherboard despite being a bit old is the one that offers the best performance in the Pandora Box because its GPU is made up of 8 cores, which in 3D games results in a performance unmatched by other more modern motherboards.
On the other hand, it is important to comment that these boards have an eMMC built into the 4GB board where the operating system (Android) runs, while the games go to a 32GB or 64Gb SD in the board's internal SD slot. This separation between OS and Games is very convenient.
Necessary material: USB memory in FAT32 or exFAT format
Step 1 - Create the directory "games" in the root of the USB
Step 2 - Create the subdirectory "download" within "games"
Step 3 - Create the directory "mcgames" in the root of the USB
1. Add 3D Games
To add 3D Games, create within games / download a directory with the name of your game and copy inside your ROM with the same directory name.
The types of ROMs supported are detailed in the attached document “Install2DGamesXML”For each emulator.
2. Install 2D or 3D Games
Adding is not the same as installing. The separation of the OS and the games in different units allows us to "install" games on the USB in a relatively simple way. In this case "install" means that the database of the games it contains is created within the USB itself, and of course the roms and videos.
2D games can only be installed while 3D games can be installed or only added.
So, for 2D Games it is necessary to carry out an "installation" of the game using an xml file. Inside the "mcgames" directory, create a directory with the name of the 2D game and inside copy your rom, normally in zip format, and a video in mp4, with the same names as the directory. Also create an xml file with the same name and with the following content:
<?xml version=”1.0″ encoding=”UTF-8″?><game name=”nombre_rom” emulator=”3″>
<information>
<description>Mi Juego</description>
<cloneof>null</cloneof>
<language>EN</language>
<year>0</year>
<manufacturer>null</manufacturer>
<player>0</player>
<genre>3</genre>
<width>0</width>
<height>0</height>
<bootleg>0</bootleg>
</information>
<file>
<rom name=”nombre_rom.zip”/>
</file>
<translation>
<string language=”EN”>
<name>My Game</name>
<detail>null</detail>
</string>
<string language=”ES”>
<name>Mi Juego</name>
<detail>null</detail>
</string>
</translation>
<config>
<flag>0</flag>
<load_time>17000</load_time>
<free_play>true</free_play>
<save_state>false</save_state>
<start_directly>true</start_directly>
</config>
</game>
where you have to replace game_name with the name of your ROM.
Also, in the "mcgames" directory, create an install.txt file that contains line by line the names of the 2D roms that you want to install.
The different parameters of the XML file are explained in the attached document "Install2DGamesXML.pdf”That you can download Here . This document was published by a certain “querol” of the community, and around it new ways of “playing” with Pandora are being developed.
Before connecting the USB it is necessary to put the Pandora in English. To do this, press the physical button "CFG" on the back of the Pandora, thus entering the settings, where it is possible to change to English and several other languages.
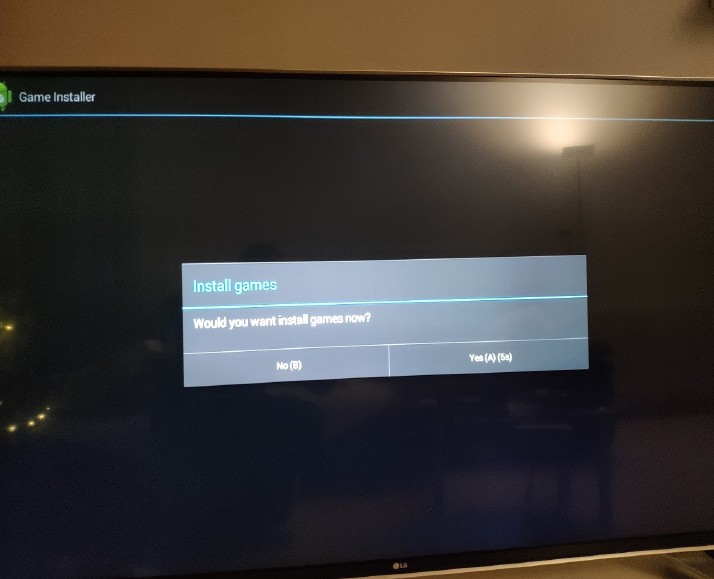
Finally, with Pandora booted in the default interface, connect the USB memory to the USB port lower and an Android installer will jump that will install the 2D roms that appear in the install.txt.
Once installed (they have been copied to games / data), the directories inside "mcdownloads" can be deleted and the install.txt file emptied so that the installer does not jump again when the USB is inserted.
To return to Pandora's default games list, it is necessary to turn off Pandora, remove the USB, and boot. If your list of games does not load correctly, it is because the USB has not been unmounted correctly. To do this, turn off the Pandora with the rear switch and also disconnect the power supply for a few seconds, and restart.
The 2D ROMs for Mame must correspond to the SETs or versions that Pandaro supports, that is, mame37, mame139, mame78 and mame19, as can be seen in the table in the attached document "Install2DGamesXML.pdf”.
Lastly, it is also possible to “install” 3D games exactly the same as 2D ones, in case you want more control over the game's characteristics that will appear in the Pandora menu (type, video, etc).
As a demonstration and reference, you can download HERE An example generated by a user on the Internet.
You can also download HERE an example of files to extract directly to the root of the USB and thus take as a reference. In this case you will have to add the roms yourself in the corresponding directories.
For 2D ROMs, we insist that they must be from supported MAME SETs. For example: https://wowroms.com/en/roms/list/mame+0.139u1.
For PSX ROMs, the supported format should be IMG (with CCD and SUB normally). However, it is common to find ROMs in PBP format, but there is a PSX2PBP software that allows you to perform the opposite action of converting PBP to IMG.
As you know, not all games will work, it is trial and error, although a large majority. If with a PSX game it loads well but when the action starts cascading, it is surely due to the vibration function, which is not supported in these Pandora. To solve it, you simply have to enter the options within the game itself and disable the vibration (or rumble).
On the Internet it is possible to find installation packages pre-created by other users, which you can take as examples, but there is also a project "PandoryTool”Which allows to create packages automatically to simply copy the USB. You can then see how he creates the XML and use them as examples.
Amlogic S912 boards and similar
In the case of previous Pandora 7 3D models, the motherboard was an Amlogic S912 and adding games was relatively straightforward.
Necessary material: USB stick in FAt32 (also through an SD Card but it implies opening the Pandora's box, thus losing the warranty) connected to the USB port higher of the Pandora.
a) For 3D Games: ROMs are required in the following formats, PSP (iso), Dreamcast (cdi), Nintendo 64 (n64) and PS1 (pbp).
Step 1 - In the root directory of the USB create a directory "roms"
Step 2 - Inside "roms" create a subdirectory with the name of the game
Step 3 - Copy the game rom into the subdirectory
Step 4 - (optional) Add an image in JPG format to be displayed in the Pandora menu
b) For 2D games: Only Mame 0.139u1 and FinalburnAlpha roms in ZIP format are supported.
Step 1 - In the root directory of the USB, create a directory "2d" and within a subdirectory "roms"
Step 2 - Add the roms in zip format inside "2d / roms"
Step 3 - If the game is compatible it should automatically appear in the list.
Alwinner H3 plates and similar
These are the Pandora Box 6 from 3A Games or clones. In this case, adding new games is simple but it only supports FBA / MAME / PS1 emulators.
You have to create in the root of the USB the folders "roms_fba", "roms_mame" and "roms_playstation", and copy your ROMs directly to the corresponding directory.
———-
If you still don't have your Pandora Box 3D SAGA Ex you can buy it from here: